
Mathematical Proofs: Geometric Voting
Proof CG8: Example of Vulnerability to Tactical Voting
This example relates to four significant and key voting systems. Given three candidates in an eight-voter election, these systems and their likely weightings (w1,w2,w3) are listed below:
- Plurality (FPTP) with weightings (1,0,0)
- CHPV with weightings of say (4,2,1) or (1,1/2,1/4)
- Borda Count with weightings of (3,2,1) or (2,1,0)
- Anti-Plurality with weightings of (0,0,-1) or (1,1,0)
Candidate tallies will differ depending on the set of weightings used for any particular voting system. In order to plot election outcomes onto a three-candidate map, these weightings need to be normalised such that the three non-negative weightings sum to unity. Further, to aid voting system comparisons between election outcomes on their respective maps, the weightings are here normalised into the format (1-x,x,0). Despite the variation in candidate tallies, the resultant outcome rank ordering of the candidates is identical to that using any corresponding one of the valid weightings sets listed above. Converting any weightings set (a,b,c) into the desired format (1-x,x,0) is achieved using the transform (a-c,b-c,c-c)/(a+b-2c) to ensure equivalence and normalisation. Hence, the following weightings set for each voting system is used for the mapping of election outcomes.
- Plurality with weightings (1,0,0) where x = 0
- CHPV with weightings (3/4,1/4,0) where x = 1/4
- Borda Count with weightings (2/3,1/3,0) where x = 1/3
- Anti-Plurality with weightings (1/2,1/2,0) where x = 1/2
Each of the eight voters casts one out of six possible ranked ballots; namely, A>B>C, A>C>B, B>A>C, B>C>A, C>A>B or C>B>A. There are therefore six to the power 8 or 1,679,616 permutations to consider. As it is unimportant as to which voter casts which ballot, the total number of different election profiles that could result from the election fortunately reduces to 1035. All these profiles are compiled on an Excel spreadsheet that is too large to include here but it is available on request; see the Author and Contact page. The first nine of these election profiles are provided for each of the four voting systems as a guide to how election outcomes are plotted and how many profiles generate each unique one; see relevant section below.
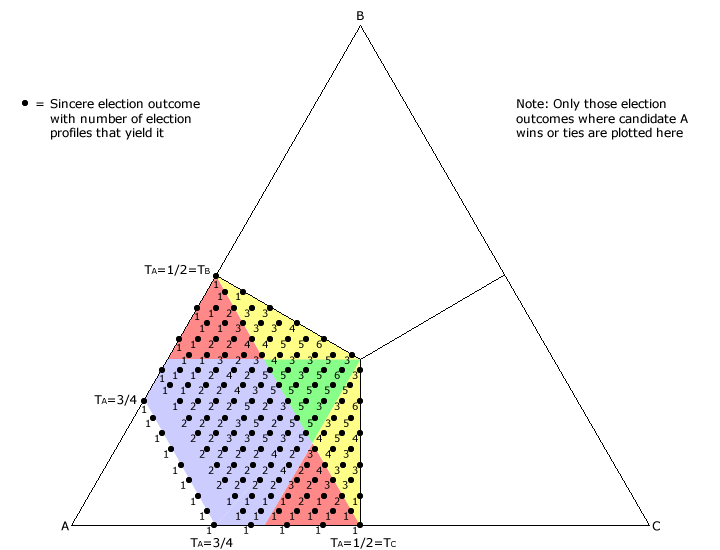
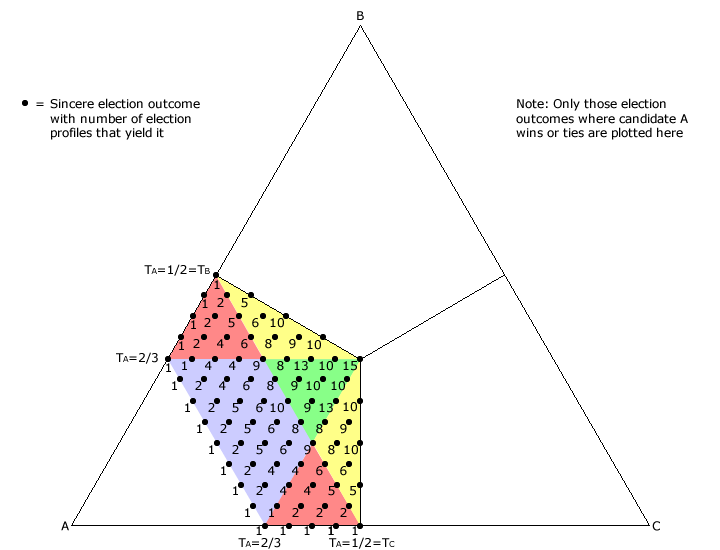
In the main text example of a three-candidate election, the tactic of burying (swapping second and third preferences) and of compromise lifting (swapping first and second preferences) is explained. The three-candidate map below illustrates the tactical voting options for a ranked ballot election using the preference weightings (1-x,x,0). The six coloured sectors on the map represent the only areas where candidate A either wins or ties. Note that the area between the apex A and the line where TA = 1-x does not contain any election outcomes as this line equates to A gaining first preferences from every voter.
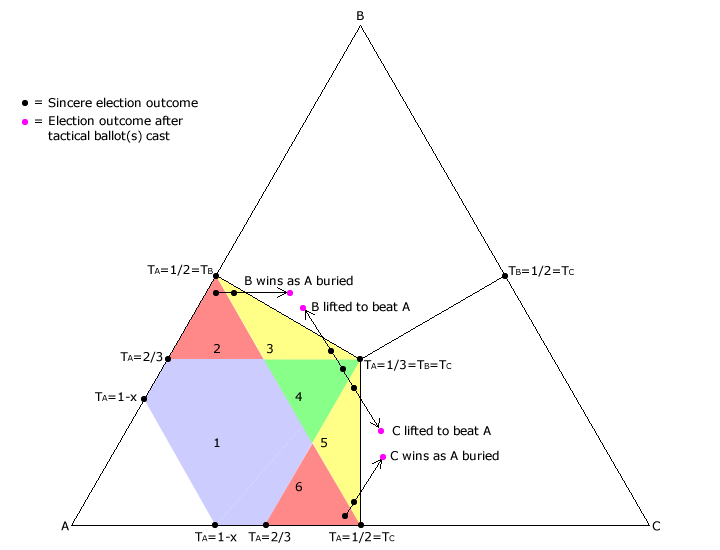
If a sincere election outcome occurs within sector 2 or 3, one or more B supporters may tactically change their ballot from B>A>C to B>C>A. If a sufficient number of sincere ballots exist and a sufficient number of them are converted into tactical ballots, then these voters may well secure a tactical win for B by burying A. This shift from sincere to tactical outcome is shown on the above map. Note that this displacement is parallel with the baseline AC as the tally for B is unchanged. However, there is a danger that if too many ballots are converted into tactical ones then C might leapfrog both B and A and inadvertently win instead of B! Similarly, if a sincere election outcome occurs within sector 5 or 6, then C supporters may achieve a tactical win instead by casting C>B>A rather than C>A>B. Here the burying shift seen on the map is parallel with the baseline AB as the tally for C is unchanged.
The only opportunities for compromise lifting to succeed is within sectors 3, 4 and 5. One or more voters preferring B over A may change their ballot from C>B>A to B>C>A for tactical advantage. If a sufficient number of sincere ballots exist and a sufficient number of them are converted into tactical ones, then by lifting B this candidate may well beat A; as shown on the map. Note that this displacement is parallel to the baseline BC as the tally for A is unchanged. Also within sectors 3, 4 and 5, one or more voters who prefer C over A may score a tactical win by casting C>B>A instead of B>C>A thus lifting C to victory. As the tally for A is still unchanged, this shift is also parallel to the baseline BC but in the opposite direction.
Within sector 1, any attempt to lift either B or C to victory will fail since any tactical displacement of the election outcome cannot move it out of sectors 1, 2 or 6 where A wins or ties. Attempting to gain a tactical victory for B by burying A instead is only possible for outcomes in sectors 2 or 3. Employing this tactic when the outcome is in fact in sector 1 or 4 will either result in failure or occasionally in C winning. In the unlikely event that numerous sincere B>A>C ballots can be converted into tactical B>C>A ones, this very act of burying A may lift C above both A and B into first place. Similarly within sector 1 or 4, attempting to bury A so that C wins will also result in failure and either A or sometimes B winning.
When voters attempt to bury A in sector 1 or 4, they either fail to dislodge A or hand victory to their least preferred candidate! Productive tactical voting is impossible in sector 1. The potentially productive option of choosing to bury or to lift is only available in sectors 3 and 5. In sectors 2 and 6 only burying may be successful while in sector 4 only lifting may achieve success.
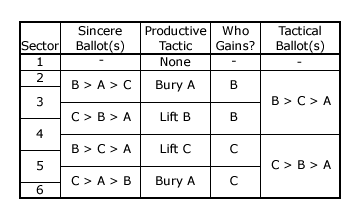
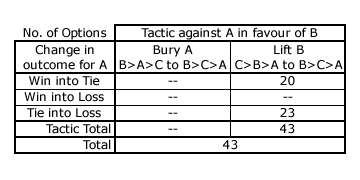
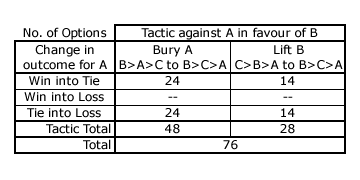
The table opposite summarises the tactical options open to voters who prefer that candidate A at least ties or better still loses. As positional voting treats all candidates fairly, the tactical options open to those voters preferring that either B or C does not win are identical in nature and scope to those for A. The analysis here assumes either that only one tactical voter exists or that several ones do but where they all employ the same tactical ballot. In other words, the tactical shift on the map is in the same direction but the magnitude may vary.
Contrasting or contradictory tactical voting may well prove counterproductive. For example, one voter lifting B over C and another lifting C over B to stop A winning will still result in A winning as the two tactical ballots exactly cancel each other out. Nevertheless, all voters remain free to vote sincerely or tactically whether it proves effective or not.
Plurality (FPTP)
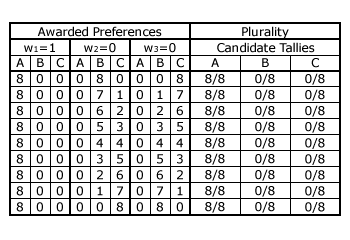
The table opposite highlights the election profiles where all voters award candidate A a first preference. Consequently, B and C receive no first preferences and A gets no second or third preferences. B could gain any number of second preferences from all eight to none while C attracts the remainder. As truncation is not permitted, B and C are given third preferences where they fail to gain a second preference. There are therefore only nine permutations where A is the unanimous choice of all eight voters.
Each voter contributes 1/8 of the per-unit tally for a candidate so here the tally for A = 8/8, B = 0/8 and C = 0/8 as first preferences are worth one and the others are worthless. In this unique case, all nine election profiles result in the same outcome. On the map below, this outcome is plotted at TA = 1, TB = 0 and TC = 0; namely at apex A. All the other possible outcomes are similarly determined and mapped. The per-unit tally for each candidate is always an integral multiple of 1/8 and the three tallies necessarily sum to one; hence the pattern of election outcome spacings on the map.
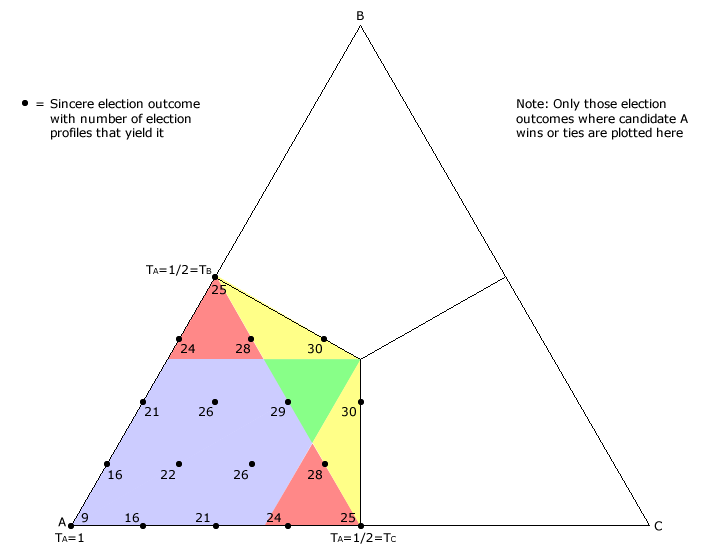
The table opposite shows the tactical options that are available to a single tactical voter who favours B over A in this plurality election example. Uniquely for this positional voting system, the second and third preferences are equal - and worthless - so the option of burying A does not exist. However, compromise lifting is available if the election outcome falls in sector 3 (yellow) or 4 (green) on the above map. For the sole tactical voter to change the election result, the sincere outcome must be critical tie (where TA = TB) or be adjacent to one (where TA = TB + 1/8).
In this example, there is only one outcome that provides an opportunity to turn a victory for A into a tie with B; namely where TA = 4/8 and TB = 3/8. According to the spreadsheet, of the 28 election profiles that produce this outcome only 20 include at least one sincere ballot C>B>A that when tactically cast as B>C>A converts the outcome into a tie. For the tied outcome (yielded by 25 election profiles) where TA = TB = 4/8, candidate C has no first preferences so no sincere C>B>A ballots exist and hence no tactical lifting is possible. For the other tied outcome where TA = TB = 3/8, of its 30 election profiles the spreadsheet identifies only 23 that include at least one sincere C>B>A ballot that the tactical voter may cast as B>C>A to hand B victory. To turn a win for A into one for B instead would require more than one tactical voter to achieve.
Consecutively Halved Positional Voting (CHPV)
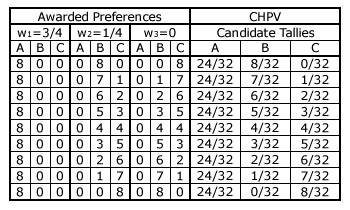
The table opposite again highlights the nine election profiles where all voters award candidate A a first preference. The distribution of second and third preferences is the same as in the previous table for the plurality system example.
Each voter still contributes 1/8 of the maximum tally for a candidate. With CHPV however, a single first preference contributes 3/4 of 1/8 = 3/32 to a candidate tally while a second preference adds 1/4 of 1/8 = 1/32 to it. Hence, all outcomes on the map below are separated by integral multiples of 1/32. The nine election profiles opposite generate the nine unique outcomes plotted along the straight line where TA = 3/4 on this map. All the other possible outcomes are similarly determined and mapped.

The table opposite shows the tactical options that are available to a single tactical voter who favours B over A in this CHPV election example. The burying option is potentially available where all those sincere election outcomes fall in sector 2 (red) or 3 (yellow) on the above map. However, by swapping the second and third preferences on a single ballot, the burying shift has a magnitude of 1/32 - 0 = 1/32. Hence, only those outcomes where a critical tie occurs (TA = TB) or where it is adjacent to one (TA = TB + 1/32) may be affected by a single tactical voter. Of the six critically-tied sincere outcomes, only 14 out of the total of 18 possible election profiles have the sincere B>A>C ballots that may instead be cast as tactical B>C>A ones to ensure B wins. For the five outcomes adjacent to a tie, only 15 out of a total of 17 possible profiles have this same burying opportunity.
The compromise lifting option is potentially available where all those sincere election outcomes fall in sector 3 (yellow) or 4 (green) on the map above. By swapping the first and second preferences on a single ballot, this compromise lift has a magnitude of 3/32 - 1/32 = 2/32. Hence, only those outcomes where a critical tie occurs (TA = TB) or where it is sufficiently adjacent to one (TA = TB + 1/32 or TA = TB + 2/32) may be affected by a single tactical voter. Of the six critically-tied sincere outcomes, only 10 out of the total of 18 possible profiles allow B a tactical win. Of the five immediately adjacent outcomes, 9 opportunities exist for a sole voter to convert a win for A (TA = TB + 1/32) into a win for B (TA = TB - 1/32). Of the other five next-adjacent outcomes (TA = TB + 2/32), 11 lifting opportunities may convert a win for A into a tie with B.
Borda Count
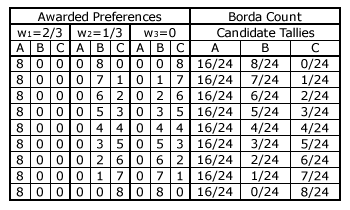
The previous nine election profiles are repeated in the table opposite. The weightings of the Borda Count are such that a single first preference contributes 2/3 of 1/8 = 2/24 to a candidate tally while a second one adds 1/3 of 1/8 = 1/24 to it. Hence, all outcomes on the map below are spaced apart by integral multiples of 1/24. The nine election profiles opposite generate the nine unique outcomes plotted along the line where TA = 2/3 on this map. All the other possible outcomes are similarly determined and mapped.
The table opposite shows the tactical options that are available to a single tactical voter who favours B over A in this Borda Count election example. The burying option is potentially available where all those sincere election outcomes occur in sector 2 (red) or 3 (yellow) on the above map. The magnitude of the burying option is here 1/24 - 0 = 1/24. Hence, only those outcomes where a critical tie occurs or where it is adjacent to one may be affected by a single tactical voter. Of the four two-way critical ties, only 24 out of the total of 26 possible election profiles permit a tactical burying option to hand B victory over A. Of the four adjacent outcomes, again only 24 out of the total of 27 possible profiles enable B to tie with A.
For the three-way critical tie (yielded by 15 election profiles), there is no means by which any voter may cast a productive tactical ballot. For example, if a B supporter buries A by casting B>C>A instead of a sincere B>A>C ballot, then their least preferred candidate C is thereby promoted to victor. For all voters, their best strategy is to maintain the tie and hope that their most preferred candidate wins the tie-break.
The compromise lifting option is again potentially available where all those sincere election outcomes fall in sector 3 (yellow) or 4 (green) on the above map. Uniquely for this positional voting system, the magnitude of the lifting option is the same as for the burying one since 2/24 - 1/24 = 1/24. Unlike with the CHPV election example, there are therefore no next-adjacent outcomes to consider with the Borda Count. Of the four critically tied outcomes, 14 out of the total of 26 possible election profiles permit B to beat A. Of the four adjacent outcomes, only 14 out of the total of 27 possible profiles allow B to tie.
Anti-Plurality
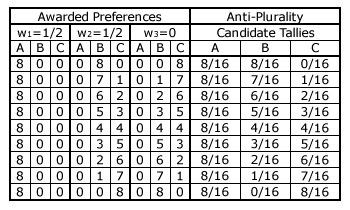
The previous nine election profiles are once more repeated in the table opposite. The anti-plurality weightings of a first and second preference are both 1/2 so a single such preference contributes 1/2 of 1/8 = 1/16 to a candidate tally. Hence, all outcomes on the map below are separated by integral multiples of 1/16. These nine election profiles opposite are plotted along the line where TA = 1/2 on the map. However, their outcomes are not unique and several other profiles produce these same outcomes. Note that uniquely for this positional voting system, the sectors 1 (blue), 2 (red) and 5 (red) do not exist as the line where TA = 1/2 also represents the maximum per-unit tally for A. All the other possible profiles are similarly determined and mapped.

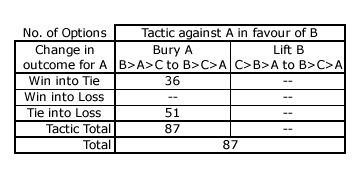
The table opposite shows the tactical options that are available to a single tactical voter who favours B over A in this anti-plurality election example. Since the weightings of the first and second preferences are equal, there is no value in swapping candidates between first and second rank on the ballot. Hence, there is no opportunity for compromise lifting with anti-plurality. With no sector 2, there is only potential for burying in sector 3 (yellow) on the above map. Hence, only those outcomes where a critical tie occurs (TA = TB) or where it is adjacent to one (TA = TB + 1/16) may be affected by a single tactical voter. Of the three critically-tied outcomes, only 51 out of the total of 60 possible election profiles allow B to beat A. Of the two adjacent outcomes, only 36 out of the total of 42 possible profiles permit B to tie with A.
Return to main text > Comparisons: Geometric Voting 10
Refer to > Mathematical Proofs: Table of Contents