
Evaluations: Teaming Thresholds 2
GV Teaming Thresholds for Clone Set versus One Candidate
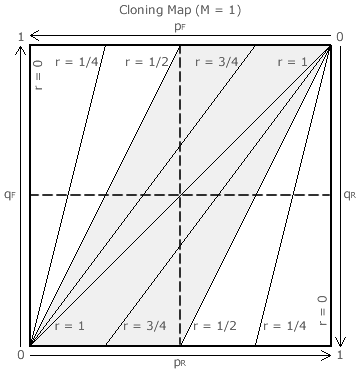
- qF > pR/r for A1 to win through teaming.
- qR > pF/r for AK to win through teaming.
In this first and simplest specific scenario, two candidates A and B are initially tied before clone set A nominates its K clones. As B is the only non-clone, M = 1. By comparing the tallies for A1 and B and then AK and B, the above two teaming threshold equations are determined.
To promote A1 through teaming, a forward slate should be issued to maximise pF. To thwart such an attempt, qR should be maximised. To put it the other way round, pR and qF should both be minimised. Where qF is larger than pR/r, A1 wins through teaming but, where qF is smaller than pR/r, B beats A1 through vote splitting. A tie is maintained when the two expressions are equal.
For a challenge by AK instead, pF and qR should now be minimised. Note that for B to win, B must simultaneously beat both A1 and AK.
Each teaming threshold is equivalent to a straight line on the cloning map opposite; where M = 1. Example lines have been plotted for values of r ranging from 0 to 1 in steps of 1/4.
For any r, there are two areas where A wins through teaming and an intervening one where A loses to B through vote splitting. A1 wins in the upper-left area and AK in the lower-right one. For CHPV (r = 1/2) as an example, its two teaming areas are highlighted here in white and the intervening vote splitting area in grey.
GV Teaming Thresholds for Clone Set versus Two Candidates
- qF > (1/2 + pR/r)/(1+r) for A1 to win through teaming.
- qR > (1/2 + pF/r)/(1+r) for AK to win through teaming.

In this second specific scenario, three candidates A, B and C are initially all tied before clone set A nominates its K clones. As B and C are the only non-clones, M = 2. By comparing the tallies for A1 and B (or C) and then AK and B (or C), the above two teaming threshold equations are determined.
Example threshold lines are again drawn on the (M = 2) cloning map opposite for the same values of r as before. Also, for CHPV (r = 1/2) as an example, its upper-left white area (where A1 wins), its lower-right white area (where AK wins) and the intervening grey area (where B and C remain tied but beat both A1 and AK) are again shown.
For all points along a teaming threshold (boundary line between a white and grey area), a critical tie between the relevant leading A clone and all the M non-clone candidates is retained.
Proceed to next page > Evaluations: Teaming Thresholds 3
Return to previous page > Evaluations: Teaming Thresholds 1