
Evaluations: Teaming Thresholds 3
GV Teaming Thresholds for Clone Set versus Three Candidates
- qF > ((2+r)/3 + pR/r)/(1+r+r2) for A1 to win through teaming.
- qR > ((2+r)/3 + pF/r)/(1+r+r2) for AK to win through teaming.
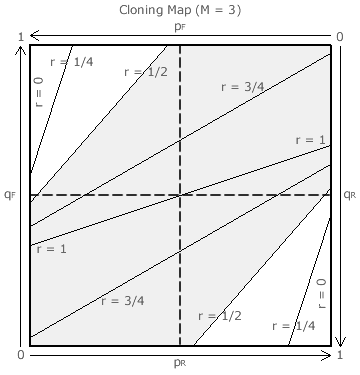
In this third specific scenario, four candidates A, B, C and D are initially all tied before clone set A nominates its K clones, so here M = 3. By comparing the tallies for A1 and B (or C or D) and then AK and B (or C or D), the above two teaming threshold equations are determined.
Example thresholds are once more presented on the relevant cloning map opposite (so M = 3) for the same values of r as before. Also, for CHPV (r = 1/2) as an example, its upper-left white area (where A1 wins), its lower-right white area (where AK wins) and the intervening grey area (where B, C and D remain tied but beat both A1 and AK) are again highlighted.
GV Teaming Thresholds for Clone Set versus Many Candidates
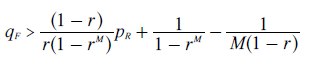
for A1 to win through teaming.

for AK to win through teaming.

In this general scenario, many candidates (M in total) are initially all tied with candidate A before clone set A nominates its K clones. By comparing the tally for first A1 and then AK against the one for any of the M candidates, the above two teaming threshold equations result.
On the cloning map opposite, example lines are only drawn here for M = 4. For any given M and r, each teaming threshold is still represented by a straight line. As before, the white and grey areas for teaming and vote splitting respectively are highlighted for CHPV (r = 1/2) only.
As can be seen from the four maps, as M increases, the white areas shrink in size as the grey one correspondingly expands. Except for r → 1, as M tends to infinity, the white areas tend to zero size in the upper-left and lower-right corners. Hence, the chances of successful teaming decrease as M rises or as r falls. Conversely, the chances of inflicting self-harm through vote splitting increase as M rises or as r falls.
In GV, there is no restriction in theory on the minimum or maximum number of candidates that may stand so the strategic nomination of clones cannot be influenced by controlling M. Only the common ratio used in the GV election may be selected to reduce the threat of teaming. The lower the common ratio, then the lower the scope for teaming.
Proceed to next page > Evaluations: Teaming Thresholds 4
Return to previous page > Evaluations: Teaming Thresholds 2