
Evaluations: Teaming Thresholds 6
Unsuccessful and Unnecessary Teaming Scenarios
In the preceding GV cloning scenarios, candidate A is initially tied with one or more other candidates. If any teaming occurs, then the tie is immediately broken and A wins. If any vote splitting occurs instead, then the tie is again instantly broken and A now loses. The teaming threshold simultaneously represents the boundary between teaming or vote splitting happening and the boundary between the leading clone winning or losing.
When A is not initially tied but is trailing or leading these other candidates, these two boundary conditions are no longer synonymous but separate and independent. The boundary between cloning giving rise to either teaming or vote splitting is called the teaming effect threshold. The boundary between cloning altering the election outcome or not is called the teaming success threshold. For clone set A against one other candidate B, the threshold equations are stated below.
- Teaming Effect Threshold: qF = pR/r for A1 as the superior fraternal clone.
- Teaming Effect Threshold: qR = pF/r for AK as the superior fraternal clone.
- Teaming Success Threshold: qF = [1 - pF(VA/VB)]/r for A1 as the superior fraternal clone.
- Teaming Success Threshold: qR = [1 - pR(VA/VB)]/r for AK as the superior fraternal clone.
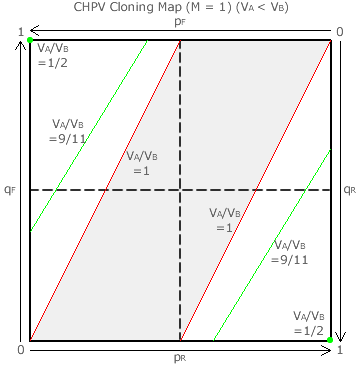
Consider an example CHPV election where the number of voters preferring A to B is VA and those voters preferring B to A is VB. The cloning map opposite illustrates the case where A is trailing B by a vote ratio of 9 to 11. Notice that each teaming effect threshold (red line) is co-incident with the original teaming threshold for the same map where A and B are tied. Consequently, the (grey) vote splitting area of the map is unchanged.
However, each teaming success threshold (green line) has now shifted from its original (teaming threshold) location such that the (white) teaming area has shrunk in size. The coloured areas of the map - those between the red and green lines - therefore represent scenarios where cloning has generated a teaming effect but where the extent of the teaming is insufficient to propel A into the lead over B.
With A initially trailing B, the chances of teaming being successful are significantly reduced even if B supporters do not react to the challenge. Where they adopt the standard tat-for-tat response of slate reversal, then it is even easier to combat the teaming by A. There are more supporters for B than for A so A gets 'buried' by more voters than B does. The end result is that the share of the tally for A is much reduced.
When A trails B by a vote margin of 1 to 2, the two teaming areas of the map are reduced to zero. For all smaller margins, there are no teaming areas at all. Here, any teaming attempt by A is doomed to failure. Therefore, B supporters do not need to respond in any way to teaming by A when the share of first preferences for A is one third or less.
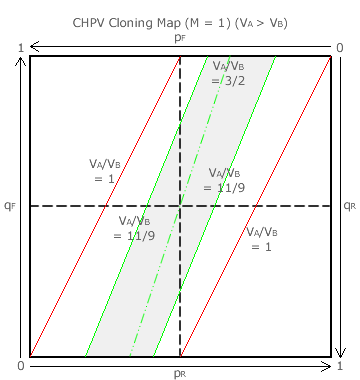
Next, consider the case where A is leading B by a vote ratio of 11 to 9; see cloning map opposite. Here, A wins anyway but nevertheless clones itself; perhaps under the false expectation of losing. Now, each teaming success threshold (green line) has shifted in the other direction and it is the (grey) vote splitting area - where A will indeed lose - that has shrunk.
The adjacent coloured areas hence represent those scenarios where some degree of vote splitting does occur but where it is not enough to cause A to lose. Clearly, B supporters do not need to respond to such a perverse challenge. By doing nothing, B could even win in such a scenario provided A leads B with a vote ratio of no more than 3 to 2.
So, if A leads B in a CHPV election, then cloning is unnecessary and teaming is either unsuccessful or counterproductive. And, if A trails B, then teaming attempts can easily be defeated using the usual slate-reversal strategy. This then results in A trailing further behind B. Hence, in a CHPV election, there is no incentive for a trailing candidate to engage in cloning.
Proceed to next section > Evaluations: Summary (RB)
Return to previous page > Evaluations: Teaming Thresholds 5